Getting Started
After successfully installing Samtec Device Connect, follow these steps:
1. Connect the Device
There are three methods for connecting to your device:
Direct Ethernet (Recommended):
Connect your computer directly to the device using an Ethernet cable. A USB to Ethernet Network adapter can be used for computers with no RJ-45 Ethernet port. This method will enable access to the device only on your machine.Device AP:
Connect your computer to the device’s Wi-Fi Access Point (AP). The device’s Wi-Fi AP will have a name prefixed with SDC- followed by device ID (e.g. SDC-ab12f34) The default password is usually samtec1!. This method will enable access to the device only on your machine.
NOTE: It’s not recommended to be more than ~20 feet from the device.Network Ethernet:
Connect the device to your network router using an Ethernet cable. This method will enable access to the device over the same network via Wi-Fi and Ethernet.
NOTE: The device will only be discoverable by computers connected to the same router.
For methods (1) and (3), it is recommended to connect Ethernet prior to providing power. If the device is part of an evaluation kit, power is usually delivered from the board itself. Refer to included documentation for power-up sequence.
2. Scan for the Device
After allowing enough time for the device to start (~60 seconds), press the Search for Devices button.
If your device shows up in the Unknown Devices section, please allow more time and then perform another search.
If your device continues not to appear, please refer to the Troubleshoot section.

3. Launch Device View
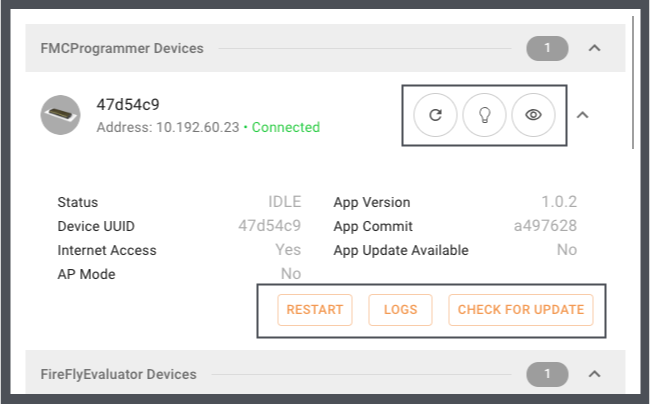
Once your device is discovered, you are now able to launch the device view (). The device’s view will open in a secondary window.

4. Additional Actions
SDC also offers a host of other device actions:
Blink:
The device’s LED will blink for 15 seconds.Refresh:
The device’s information will be refreshed.Restart:
The device’s internal application will be restarted.Logs:
Downloads the device’s app logs. This is useful if an issue arises.Check For Update:
Allows the device to check for an update (see: App Update section)
